Now I have to apologize for something...I thought I posted a long description of how to do some Flash animation here, just before I left for the break. It had screen shoots and tips. It was supposed to be for how to use Flash to do traditional style frame by frame animation. Well, clearly I failed to push some critical button.
So... here it is, a couple of weeks late, but hopefully appreciated by all of you none the less.
(I'll keep digital copies of my demos and notes for you in the lab's demo folders and maybe a pickup window too. Let me know if you have trouble following along in the step-by-step procedure so that I can make it clear to everyone in any future revisions. )
A Few Quick Steps to Animating Traditionally in Flash CS6
* I have only tried animating this way in Flash CC
briefly, but this should work there too. I recommend keeping your copy of CS6
for now.
This is a set of instructions
that will explain the basics for using Flash to animate in a traditional light
box style. You can draw and use images as if they are sheets of paper when you
animate this way. For those of you who already know how to use ToonBoom and
Harmony, this will feel a little familiar and make getting used to Flash a bit
easier. I recommend setting up a small exercise for yourself, something like a
dance or walk cycle, with a simple character, that is a short series of looping
frames.
One very important thing to
know, in Flash all frames on the timeline that have image content are called
“keyframes.” The reason for this will become clear as you learn to use Flash.
For now, do not let the term confuse you; I will refer to key drawings as
“keys” or “key drawings.” I will reserve the term “keyframe” in my explanations
for its intended use in Flash.
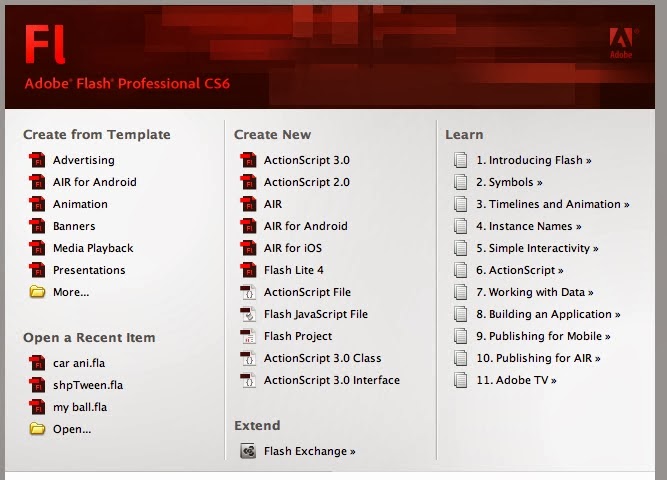
When you first open Flash CS6
you should always create a file that is in the latest Action Script format. At
this time the format to choose is under “Create New,” in the middle column;
click on “Action Script 3.0.” (By the way, it would do you well to click
through all of the links under the “Learn” section in the third column at some
point too.) After clicking on “Action Script 3.0” your workspace and stage will
open automatically add a layer to your timeline.
Before proceeding further,
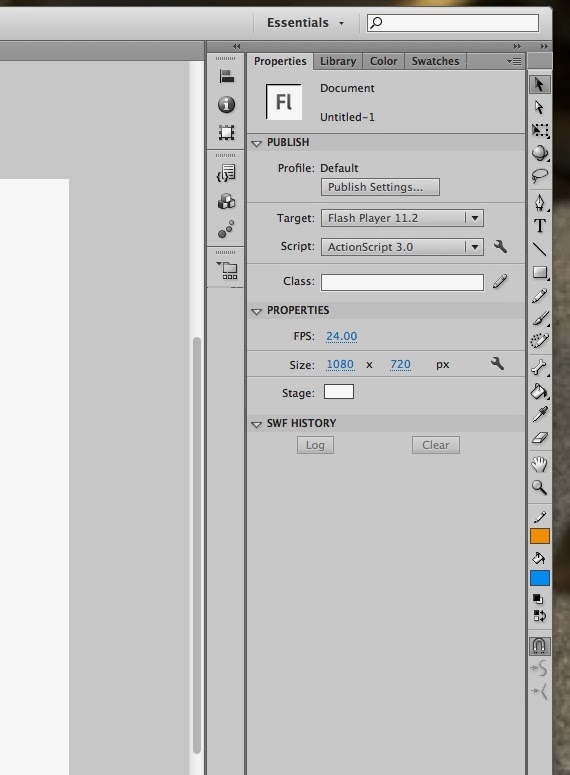
you will want to check your settings. On the left there is a set of columns and
at the top of this a set of tabs (see image below). Under the tab labeled
“Properties” and its sub-set also called “properties” you will see “size.” The
first number to the right of size is the stage’s horizontal pixel measurement,
the second number is the stage’s vertical pixel measurement. A good standard
H.264 16:9 screen ratio is 1080 x 720; type these numbers into the size
settings for your stage (this is usually the default size for homework). Above
that, make sure the FPS is set to 24; if not change that to 24 now.
On the far left is a thin
column that contains your painting and drawing (and other tools)- I will refer
to this as your main “tool-bar” from now on. From the main tool-bar, select the
brush tool and then explore the bottom five tools setting for the brush tool.
These are:
 |
| brush mode |
 |
| brush size |
 |
| brush shape |
 |
| use pressure |
 |
| use tilt |
Choose the settings that are
comfortable for you to work in for your tablet (or other input device). [I like
to turn on ‘use pressure” and “use tilt” and use a nice blue that is similar to
our traditional blue pencil.] Choose a color from the “preferences” tab which
now contains icons of a pencil and a bucket: the bucket is the color of your
brush. To change the color, click on the color block that is to the right of
the bucket icon and a color menu will pop up; choose your color from this menu.
Do not change the color of the block to the right of the pencil icon; this icon
should be set to “no-stroke” or a thin red diagonal line through a white
square. [I will go into more detail on stroke and color menus later in a
different demo.]
Now you can start roughing in
animation in a style that is like traditional on-paper animation. Go to the
“Timeline” which is arranged at the bottom of the window and click on the words
“layer 1” under the “Timeline” tab. This will allow you to edit the layer name.
Change the name of the layer to something representative of the animation you
will create, for instance “cat walk rough anim.” Next, to the right of the
layer controls, under the number one, right-click (PC) or control click (MAC)
to get a pop-up menu and choose “insert blank keyframe.” Now, with the new
blank keyframe you just created still selected and highlighted, draw a key or
extreme drawing for your animation on the stage (the area above the timeline).*
 |
| The timeline with a layer and a new blank keyframe added. |
Next choose a frame several frames from the
key or extreme you just drew; right click or control click and choose “insert
blank keyframe” again. This creates a new “keyframe” to draw on and opens a set
of grayed-in brackets above the timeline. Draw your extreme or your next key on
the stage in this new blank keyframe (you can move it around or change it later
if you like).
BTW– If you click on the onionskin button (see image below) you can
drag the brackets that appear above the timeline to control which portion of
the timeline is being viewed in onionskin or played back.
 |
| The onionskin button is highlighted here. |
 |
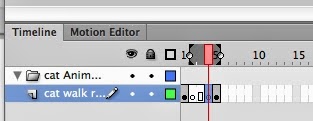
| In this picture you can see the onionskin brackets above the timeline, with the red scrub-bar or playhead positioned over the selected span. |
At this point, because you
have all done this in ToonBoom and Harmony already, you should have the idea.
There are many more ways to create animation in Flash, but this is a good way
for traditional 2D animators to get a feel for the tools. I’ll get to one of
these to you, simple motion tweening, the next time I post a demo for you.
(I’ll try to do this next one as video.)
*You may add an additional
layer or sub-layer that holds a background or motion layout by going to the
bottom left corner of the work window and clicking on the “new layer” icon.
 |
| new layer button |
If you want to add this new
layer as part of a group with the current work layer, simply use the folder
icon that is to the right of the “new-layer” icon in the bottom left hand
corner. Clicking on the “new folder” icon will create a folder in which you may
group your layers. Drag and drop your layers onto this folder layer to group
them.
 |
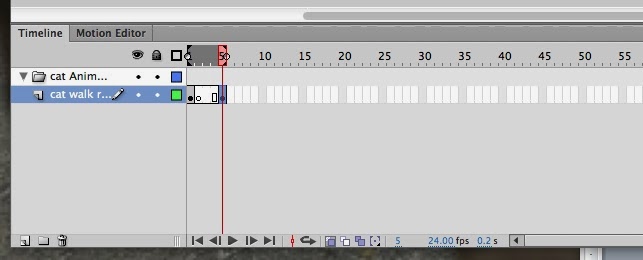
| The new layer, folder and trash buttons in the bottom left corner of the workspace. CHEERS everybody! Have a good weekend. |


